Exporting To Word and Excel
Note: To export data to Microsoft Word, you will need to have both Word and Excel installed on your computer. You do not need Microsoft Word installed to export to Excel.
By allowing you to export data to these industry standard programs, you can now combine the power of Office Express with Word and Excel. Office Express virtually provides no restrictions on what you can do using it's extremely powerful export feature.
Excel Basics
Microsoft Excel is what is known as a spreadsheet program. A spreadsheet is divided up into rows and columns. A picture is a thousand words so notice the image below and see how the columns and rows are formatted.
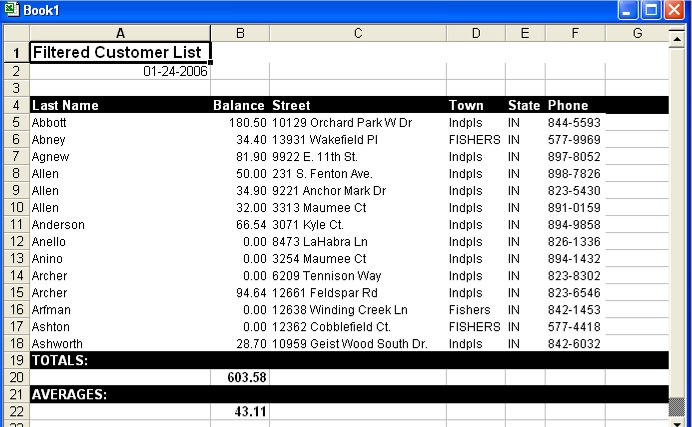
The above spreadsheet was completely created by Office Express automatically. For simple spreadsheets that will fit most of your needs you do not need any understanding of Excel to produce professional looking reports.
Note that Office Express automatically totalizes and averages all numeric columns for you. In most cases you won't need to make any further changes to the spreadsheet. You can then print the spreadsheet using Excel's File->Print option.
Word Basics
NOTE: A basic understanding of Word will make the learning curve much faster.
First lets understand MS Word's "mail merge" feature. Basically, Word allows the data from "outside" datasources, such as Office Express, to be "merged" into Word documents. As you begin to understand how the "mail merge" works, you will begin to notice how powerful this feature is.
Not only can you create mail labels, but can also create form letters, contracts, proposals and envelopes that can easily be merged into MS Word from Office Express. All the while, you can use all the powerful features available to you in Word to create professional and eye-popping pages.
When merging with Word, behind the scences, once your customers are chosen, Office Express exports your customer data to MS Excel which MS Word then merges into a "mail merge" template. You can create as many templates in Word as needed to fit various size labels, forms, envelopes and documents. Note that the design, and layout of your document is done through Word.
Keep in mind that Office Express simply provides the data to Word that will print on your document. This is where a general understanding of Word comes in to fully understand the power of the "mail merge" between Word and your Office Express data.
Creating a Document for All your Customers
As stated earlier in this document, you can print mail labels, documents, envelopes for any or all of your customers. For this example, it is easiest to set up a mail merge for all your customers.
step 1. from the Office Express main menu, select the Reports option.
step 2. select the Microsoft Mail Merge option
step 3. select the Customer Form Letters option.
step 4. a dialog box will be displayed, with two options, Open Existing and Create New. Unless you already have a document template designed, click the Create New button.
step 5. another dialog will be displayed. If you clicked the Create New button, type in the name you want want to give to your new document template. For example: Customer Collection Letter. If you clicked the Open Existing button, then click on the template you've previously created.
step 6. Office Express will then begin to export your customer data to MS Excel. If you receive a message that an Exel file name already exists... Do you want to replace it?, click the Yes button. After the data has been exported, the exported data will then be automatically be "merged" into the Word document.
step 7. if you are creating a new Word document, Office Express will display a dialog box with instructions on how to setup your new Word document. Follow these instructions and be sure to save the Word document, in Word, after you are done so you can reuse it as often as you need.
step 8. you will then be transfered to MS Word. If you had chosen an already existing template, you simply click on the Merge button in Word and Word will then begin merging your Office Express data into a new document using your mail label template to format the data.Once the merge is complete, the new document will be displayed from where you can use Word's File->Print option to begin printing your mail labels.
If you are creating a new template...
After step 8, you will be presented with a blank Word document. Follow these steps to create your document template.
step 1.create your Word document as you normally would. You can use all of Word's advanced features to create a truly professional looking document.
step 2. any where in the document that you want to place actual customer data, click on Word's Insert Merge Field button. A listing of all fields in the Office Express database will be displayed. Select the field for the information you want printed.
step 3. continue repeating step 2 until you document is layed out exactly as you want it to appear on the printed page.
step 4. BE SURE TO select Word's File->Save option to save your document template. You can then reuse it at anytime.
step 4. click the Merge... button. Word will display a dialog box. Make sure the Merge to: box reads New Document.
step 5. Word will create a new document with your Office Express data merged into the document using the template you just created. You can then begin printing your documents by selecting the File->Print option from Word's main menu.
IMPORTANT: Make sure to Save your new mail label template when you are done. You only need to create the template once if you use the same labels over and over again. If you use different labels, you will need to create a template for each label style.
Home | Using Office Express the First Time | Creating Mail Labels | Table of Contents |