Creating Mailing Labels
For this feature you will need to have Microsoft Word and Microsoft Excel installed on your computer. The label will be designed in and printed from Microsoft Word. To print mailing labels:
Office Express allows you a variety of ways for printing mail lables. You can print labels for all your customers at once or you can print mail labels for only selected customers.
The Basics
NOTE: A basic understanding of Microsoft Word will make the learning curve much faster.
First lets understand MS Word's "mail merge" feature. Basically, Word allows the data from "outside" datasources, such as Office Express, to be "merged" into Word documents. As you begin to understand how the "mail merge" works, you will begin to notice how powerful this feature is. Not only can you create mail labels, but can also create form letters, contracts, proposals and envelopes that can easily be merged into MS Word from Office Express. All the while, you can use all the powerful features available to you in Word to create professional and eye-popping pages.
When merging with Word, behind the scences, once your customers are chosen, Office Express exports your customer data to MS Excel which MS Word then merges into a "mail label merge" template. You can create as many templates in Word as needed to fit various size labels. Note that the design, the label layout and the label printing is done through Word.
Keep in mind that Office Express simply provides the data to Word that will print on your labels. This is where a general understanding of Word comes in to fully understand the power of the "mail merge" between Word and your Office Express data.
Creating Mail Labels for All your Customers
As stated earlier in this document, you can print mail labels for any or all of your customers. For this example, it is easiest to set up a mail merge for all your customers.
step 1. from the Office Express main menu, select the Reports option.
step 2. select the Microsoft Mail Merge option
step 3. select the Customer Mail Labels option.
step 4. a dialog box will be displayed, with two options, Open Existing and Create New. Unless you already have a mail label template designed, click the Create New button.
step 5. another dialog will be displayed. If you clicked the Create New button, type in the name you want want to give to your new mail label template. For example: Customer Mail Lables. If you clicked the Open Existing button, then click on the template you 've previously created.
step 6. Office Express will then begin to export your customer data to MS Excel. If you receive a message that an Exel file name already exists... Do you want to replace it?, click the Yes button. After the data has been exported, the exported data will then be automatically be "merged" into the Word document.
step 7. if you are creating a new Word document, Office Express will display a dialog box with instructions on how to setup your new Word document. Follow these instructions and be sure to save the Word document, in Word, after you are done so you can reuse it as often as you need.
step 8. you will then be transfered to MS Word. If you had chosen an already existing template, you simply click on the Merge button in Word and Word will then begin merging your Office Express data into a new document using your mail label template to formaat the data.Once the merge is complete, the new document will be displayed from where you can use Word's File->Print option to begin printing your mail labels.
If you are creating a new template...
After step 8, you will be presented with a blank Word document. Follow these steps to create your mail label template.
NOTE: If you have Word 2003, or later, the instructions are at the bottom of this document.
step 1.select Word's Tools option, then select the Mail Merge... option.
step 2. click the Setup buton. A dialog box will appear that will allow you to choose the label brand and product number for the labels you purchased. After selecting your label, click the OK button.
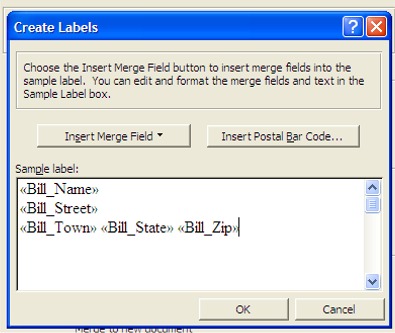
step 3.Word will then display the Create Labels dialog box as shown below. For each data field you want to print on your labels, click the Insert Merge Field button and select the corresponding data field. Place the data fields as you want them to appear on the label. See the example below. When you have placed all your data fields in the Sample label edit box, click the OK button to contine.
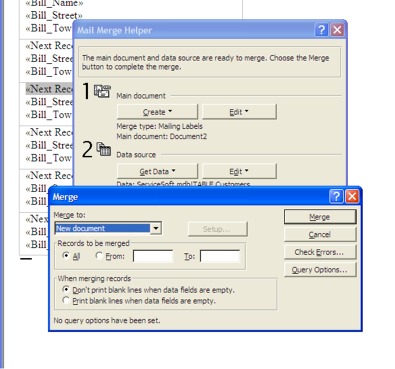
step 4. click the Merge... button. Word will display a dialog box as shown below. Make sure the Merge to: box reads New Document.
step 5. click the Merge... button.
step 6. Word will create a new document with your Office Express data merged into the document using the mail label template you chose. You can then begin printing your labels by selecting the File->Print option from Word's main menu.
IMPORTANT: Make sure to Save your new mail label template when you are done. You only need to create the template once if you use the same labels over and over again. If you use different labels, you will need to create a template for each label style.

Home | Using Office Express the First Time | Exporting Office Express Data to Microsoft Products | Table of Contents |