Job Routing
Job routing is simply the process of organizing your customers into an order that you want you and/or your employees to complete the jobs.
Office Express gives you a lot of flexibility on how you can accomplish this.
At a simplistic level, Office Express allows for three levels of sorting your customers to create a "route". For conversation purposes, the first level is the Crew level, the second level is the Zone level and the third level is the Route # level.
THE CREW SORT LEVEL
When Office Express sorts customers to place them in "route" order, the customers are first sorted by their crew number. For example, let's look at a sample route for your weekly maintenances:
Last
Name
Crew
--------------------------------------------------------------
SMITH
JONES
DOE
1
STARSKY
1
HUTCH
2
COLUMBO
2
MASON
3
MC
CLOUD
3
Notice above, the customers are sorted by their crew #. Note that customers not assigned a crew number rise to the top of the list. When assigning numbers you can use any number between 0 and 65,535. If for any reason you want to move customers to the end of the list assign a very high number like 59,999.
Obviously by the name of the first sort level, Crew, you would use this to define the crew the customer is assigned to if you run more than one crew. You could also use the Crew field for the customer's service day of the week instead. For example, Crew 1 would mean Monday, Crew 2 Tuesday, Crew 3 Wednesday and so on.
THE ZONE SORT LEVEL
The second level of sorting is by Zone number. A zone could be used to define a town, a zip code or anything else you can think of. The following illustration will help to understand.
Last
Name
Crew Zone
---------------------------------------------------------------------------
JONES
5
SMITH
10
DOE
1
40
BARETTA
1
40
STARSKY
1
45
MANNIX
1
45
HUTCH
2
20
COLUMBO
2
20
MASON
3
100
MC
CLOUD
3
110
MC MILLAN
3
110
In the above example, notice Jones and Smith have changed places from the previous example. This is because Jones has a lower zone number than Smith.
Also note that the crew numbers are still in order and the customers inside each crew are sorted by the zone #. If using zones to represent towns then you could make a list of towns you service and assign each town a number as shown below...
In the above example:
Zone 5 = Sometown
Zone 10 = Jonestown
Zone 40 = Whoville
Zone 45 = Whoville Park
and so on...
ROUTE # SORT LEVEL
The final level of sorting is the route # level. Following the previous examples, we now have a customer list that has the crew and zone (town) defined. But, what happens if there are customers who live in the same town and are assigned to the same crew?
Notice in the example above, McCloud and McMillan are both assigned to the same crew and zone, but we want McMillan to be above McCloud.
Simply use the route # to do this. The route# allows you to put your customers into their "final" position as shown below...
Last
Name
Crew
Zone Route
-----------------------------------------------------------------------------------------------
COLUMBO
2
20 5
HUTCH
2
20 10
MASON
3
100 5
MC MILLAN
3
110 10
MC
CLOUD
3
110 15
Notice in this example Columbo and Hutch also changed position from the previous example because Columbo was given a lower route #.
TIPS AND TRICKS
Notice in the example above, the route #' s are defined in 5's: 5, 10, 15, 20, 25 and so on. By doing this you can easily insert a new customer into the route without having to reroute the list.
In other words, let's say you customers we routed 1, 2, 3, 4, 5 and so on. What happens when you want to insert a new customer between 2 and 3? You can't have 3 1/2.! So when routing, use a numbering system that allows you to easily fit new customers into the route. Remember you can use numbers between 0 and 65,535.
USING THE OFFICE EXPRESS ROUTING FEATURE
If you understand the topics above you're ready to route jobs. The image below displays the Office Express Routing Page. Notice how the customers are arranged by their routing information.
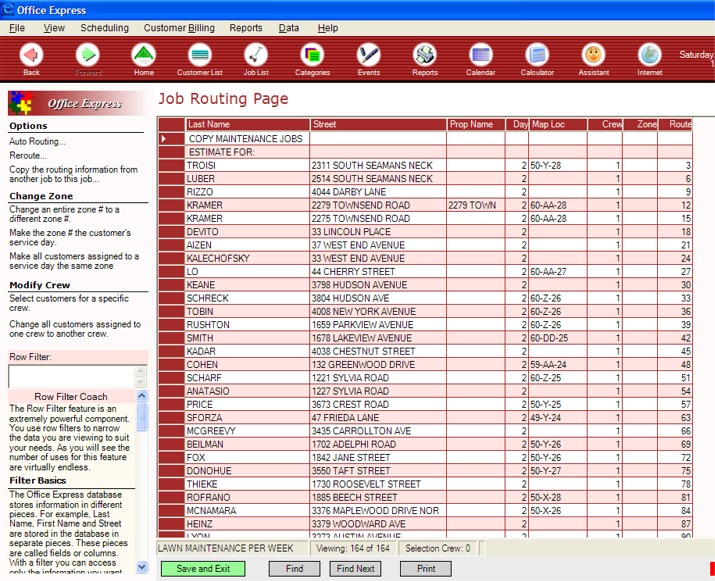
Notice that in this implementation, there are no zone numbers defined. For this application only crew and route #'s are necessary to define the route entire.
You are free to define your routes to best suit your needs.
Once you have finished routing your jobs your ready to begin printing workorders and route sheets.
Home | Using Office Express the First Time | Table of Contents | Workorder and Route Sheets | Scheduling Customers Who Need to be Called in Advance |