Workorders, Route Sheets and Job Notifications/ Waivers
NOTE: If you have not routed your jobs yet then click here...
To begin, let's define the differences between the three:
Workorders- a workorder prints the jobs to be completed at a single job side. Workorders print one per job site. The advantage of printing workorders are you can place information about chemical usage and other important information that you might need for your governmental record keeping. You save your completed workorders as your D.E.C. records. The disadvantage is you use a lot more paper and the print time is longer.
Route Sheets- route sheets print as many customers as can fit on a page. A route sheet is ideal for your daily maintenance routes. Each customer prints in order of their route number. The advantage is many customers will print on the page so much less paper is used and the print time is much shorter.
Job Notifications- job notices are required in certain areas of the country where your customers must be notified in advance before you do work the uses chemicals. Job notices print one customer per page and normally mailed or dropped in each customers a pre-determined time before the job will be done.
There also is a Job Completion Ticket that Office Express can print. These tickets are left at the job site when you are done. The ticker alerts the customer that you were there and allows for you to put any special instructions the customer might need to know about the job.
NOTE: Before you can print any of the features described here, you must have already scheduled the jobs for each customer. If you have not scheduled jobs yet, click here...
PREPARING TO PRINT
The steps for printing all three items is essentially the same. We will discuss printing workorders first.
1. select Scheduling from the main menu
2. select Print Workorders/Route Sheets...
3. the Print Workorders Wizard will appear. click Next
4. a list of five options will appear for selecting how you want to retrieve the
jobs, select the option you want, click the Next button.
5. Depending on which option you selected the next page in the wizard will ask
to further define how the jobs will be located, click the Next button to
continue.
6. the Wizard now displays a page asking you which customers you want to print
for. When done click the Next button.
7. the next page is the page in the Wizard that allows you to either continue or
go back and review your choices. Click the Finish button to continue.
Office Express will now gather the jobs you requested and display the found jobs on the screen. This screen gives you a chance to make last minute price changes or you can delete off any customers you do not want to print a workorder for. When you are satisfied with the list click the Continue... button at the bottom of the window. A dialog box like the one below will be displayed:
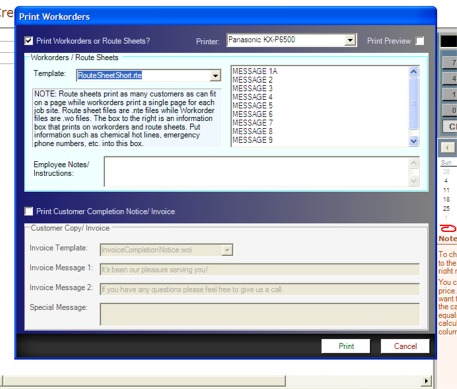
The fields of the dialog box are:
Part I
Print Workorders or Route Sheets?: Put a checkmark in this box if you want to print a workorder or route sheet.
Printer: choose the printer you want your workorders to print to if you have more than one printer.
Print Preview: Put a checkmark in this box if you want to see the print on the screen without printing on the printer. This feature is useful when you are first learning the system so you don't waste paper and ink/toner as you are testing the system.
Template: Choose the template you want to use. Remember, workorder print one customer per page while the route sheets print many customers per page.
Message Text Box: To the right of the Template field is a text box that you can put important information such as chemicals used, emergency phone numbers, your beeper number, etc.
Employee Notes/Messages: Another area you can basically put any pertinent information you might require.
Part II
Print Customer Completion Notice/ Invoice: If you want to leave a "ticket" at each job site, notifying the customer you were there then place a checkmark in this box. Also, if you have jobs scheduled that are billed at the time the job is completed then checkmark this box because it will print an invoice that you can leave at the job site (save stamps).
If you are not printing a Completion notice/ invoice then skip the next steps.
Invoice Template: select the document you want Office Express to use for printing. Note that Office Express ships with only one document for this option. You can create your own though. If you created your own it will be in the template list.
Messages 1 & 2: These messages are messages that also appear on your customer invoices. You can change them to whatever you choose.
Special Message: Again, any message you might want to have printed like holiday greetings, specials, alerts, reminders and so on.
Part III
When done, click the Print button to begin printing.
NOTE: If you are interested in creating your own workorders, route sheets or invoices document click here...
JOB NOTIFICATIONS/ WAIVERS
The steps for creating and gathering the customers are exactly the same as above and will not be recovered. There are a few difference in the dialog box that appears just before you begin printing. As seen below.
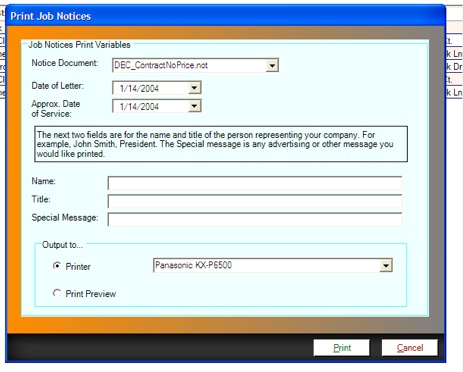
Date of Letter; Put the date you want the letter to be dated.
Approx Date of Service: Depending on your area, you might be required to supply the customer with an approximate date the job will be done.
Name: Usually the owner of the company
Title: Normally, President or Owner
Special Message: Anything you choose.
Home | Getting Started | Table of Contents | Creating Documents | Job Routing | Scheduling Customers who need to be Called in Advance |