Inserting Customers
If you have viewed the previous help sections you are ready
to begin inserting customers into the Office Express database. As mentioned in
an earlier lesson, you should gather all the information you have already about
your customers before adding your customers to Office Express.
You can insert customers from two different places in
Office Express. The Office Express Home page allows you to quickly insert
customers. Or, if you click the Customer List icon in the navigation bar at the
top of the screen you can work from the Customer Page. To insert from the
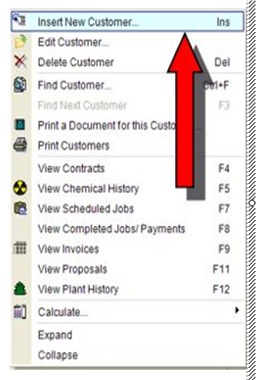
customer page either press the Insert key on your keyboard or click the right
mouse button. If you clicked the right mouse button a menu like the one above
will be displayed. Select the Insert option.
When you select the Insert option, the Customer Edit
Wizard will be displayed. The Customer Edit Wizard consists of five different
pages. This topic will focus on the first page of the wizard, assigning the
customer a category.
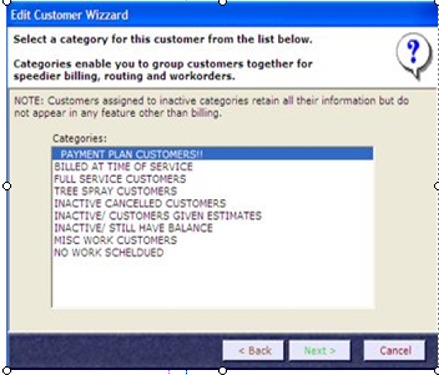
ASSIGNING A CATEGORY
As described in the About Categories lesson, Office
Express requires that every customer be assigned to a category.
The first page of the wizard lists all the categories you
have in your category list. Simply highlight the category you want the customer
to be assigned to and click the Next button at the bottom-right of the wizard.
NOTE: You can change the customer's category at any
time. After you have all your customers inserted you can fine tune your customer
list later on and quickly move customers from category-to-category.

DEFINING THE CUSTOMER ADDRESS
Notice under the wizzard page header the are three tabs,
Service Address, Billing Address and Phone numbers. Click on each tab to enter
or edit that information.
Office Express requires that you at least enter a last
name for each customer. All other fields are optional. When you move the mouse
cursor over a field a tip will be displayed with further explanations for the
field.
TIP: If you right click on the First name, Street
and Town fields a menu will be displayed listing choices for that field. Office
Express builds a list of streets, towns and zips as you insert customers. Note,
when using this feature on the Street field, enter the house number first!
TIP: If the service address and the billing address
are the same, click the Copy to Billing Adress button so you won\'t need to
retype the same information into the billing address.
Click the Next button to move to the next page in the Wizard.
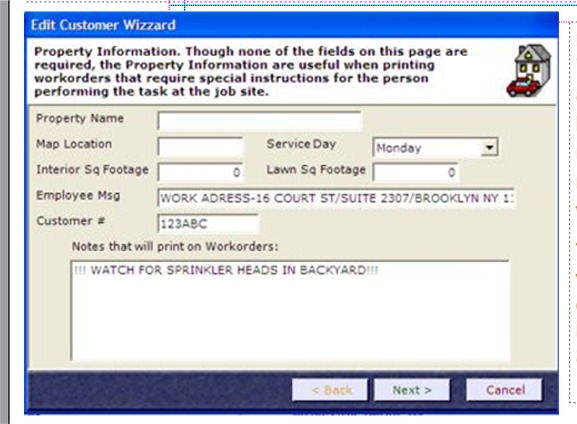
PROPERTY INFORMATION
The next page is for misc. customer information. None of
the fields are required. This page has fields that are useful when printing
workorders and route sheets. The
Employee msg and Workorder notes are useful in this context.
If the customer is a weekly maintenance customer, be sure to assign the proper
service day-of-the-week for the customer.
The Property
Name field is used in
situations where you do work for a customer or a corporation that owns multiple properties. This allows for the property
name
to print on a bill that is
mailed to the main office. Click the Next button to move to the next page in the Wizard.
Home | Table of Contents | Office Express Basics | Inserting Customers Part 2 | Viewing Customers | About Job Codes | About Customer Categories | Creating Customer Templates |